Designing an Arrow Maze
22nd August 2015
If you enjoy solving the logic mazes on Mazelog, why don't you have a go at designing your own logic maze? A good place to start is with an Arrow Maze. If you're not familiar with these mazes see the following simple introduction: Arrow Mazes.
Here's a simple tutorial showing how to set about designing such a maze.
Draw the grid
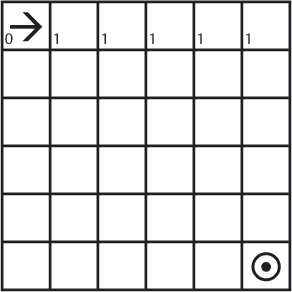
First draw a grid for your maze, and decide where the start and finish should be. A good size is 6 x 6, and I usually make the starting square at the top left corner and the goal in the bottom right corner.
Next draw in the arrows to define the maze. I recommend using a pencil so you can erase arrows if you want to change part of your design.
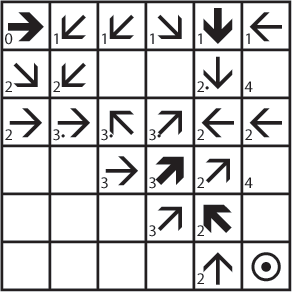
Put the first arrow on the starting square; obviously this will have to point right or down in the case of a square grid. Then label the starting square with a small "0", and label all the squares this points to with a "1", to show that you can reach these squares in one step:
Add arrows
Now decide what arrows to put in the squares labelled "1", and label all the squares these lead to with a "2":
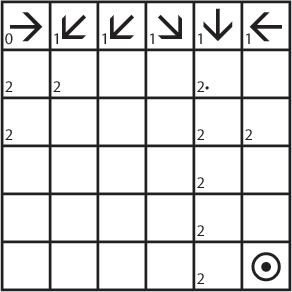
Note that one of the squares labelled "2" can be reached in two different ways. Add a "•" after the "2" on this square to remind you. We shouldn't make this square part of the winning route through the maze, as there will then be two alternative solutions with the same number of steps.
Now fill in the arrows on the "2" squares and label the squares they point to with a "3":
Note that some of the squares they point to already have a number written on them; we don't write a "3" on these squares because we can already reach them in fewer than three moves by another route.
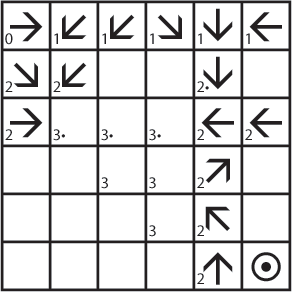
Next step; write arrows on the "3" squares and label the squares they point to with a "4":
It's a good idea to choose the arrows so they cover only a few new squares, to leave several squares inaccessible for later stages of the route.
Plan the winning route
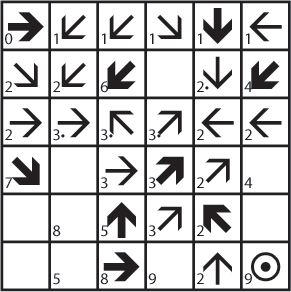
When the grid is about half-filled with arrows it's a good idea to choose what will be the winning route, and make the arrows on the route bold (or draw over them in a different colour):
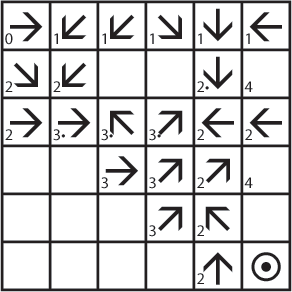
Add the remaining arrows for the winning route, taking advantage of the blank squares that cannot be reached by a shorter route:
Complete the maze
Finally fill in arrows for the remaining blank squares, making sure that you don't provide a short cut to the solution. Here's one possible set of arrows:

A couple of these arrows are designed to confuse people who try solving the maze by working backwards from the goal; you may want to build in a longer false trail from the goal to make this approach harder.
So now you have a finished maze:
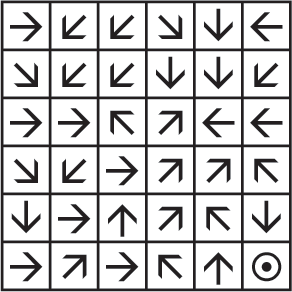
By writing the numbers on each square as you go along you keep track of the shortest number of steps to each square, so you can be sure that your path through the maze is the unique shortest solution.
Now try your hand at designing your own Arrow Maze!
blog comments powered by Disqus